
Create beautiful lists of Salesforce records with FlexCards. This post is part of the FlexCard Design Thinking mini series.
This pattern assumes you want a FlexCard to show a list of records on a page (e.g. list of my submitted grant applications). There’s an example for each of the Three Tenors (my favorite context variables): {recordId}, {User.userId}, and {User.userAccountId}.
Benefits / Lessons Learned
- When you add a DataRaptor to a FlexCard, it will display the card multiple times if the returned data includes multiple records (called an array in developer or JSON-speak). You can prevent this and just show the first record, but in these examples it’s exactly what I wanted: show me the same card over and over for each record returned by the DataRaptor. You could meet me in the middle and show something like the 5 most recent – that would require adding ORDER BY and LIMIT parameters to your DataRaptor’s extract step.
- I can nest FlexCards – put FlexCards inside other cards. I used this technique in two different ways:
- Nesting Use Case #1: A list of cards was nice, but I quickly learned that I wanted them to appear in some sort of container with a banner/header. You can’t put all of that on one FlexCard, because it would repeat for each card in the list. So instead I created an outer FlexCard for the banner/header and outer border, and then built a separate project list FlexCard that I embedded inside of it (called a “child” FlexCard). I used this technique in all three of the above examples.
- Nesting Use Case #2: I could take the current card’s recordId and then pass it to an embedded FlexCard, where it could be used to feed an entirely separate DataRaptor and display related data. This is what I did in FlexCard #3 – I had one FlexCard to show a list of projects, but every time a project card was created it would decide whether to display the inner card if there were any open tasks found for the Project.
- Cards are much nicer to behold than standard record lists, especially in Experience Cloud sites.
- A child card has access to global context variables, like
{User.userId}and{User.userAccountId}. - I can make pretty things using emojis and status field values, and then conditionally show whichever one applies to the current record. Cool, huh?
- You can create horizontal and vertical lists with your child card:
- To make them tile horizontally (like in Example #1, FlexCard #3), you reduce the card’s width to something less than 12 (which is the full width in the Lightning Design System’s grid layout). Make it a divisor of 12 though (2, 3, 4, or 6) so your tiles will consume the full width of the layout. Extra cards spill over and create extra rows of tiles.
- To make a vertical list (like in Example #2, FlexCard #2), you leave the width of the card set to 12 (which is the default), so that each iteration of the child card consumes the full width of the layout. Each iteration of the child card will show up as another row.
Moving Parts
This pattern includes the following moving parts.
- 1 x FlexCard, placed on a community or Lightning record page, to serve as the parent / container card.
- 1 x child FlexCard, embedded in the parent card. Head’s up: you won’t be able to embed your child card into the parent until your child has an active version.
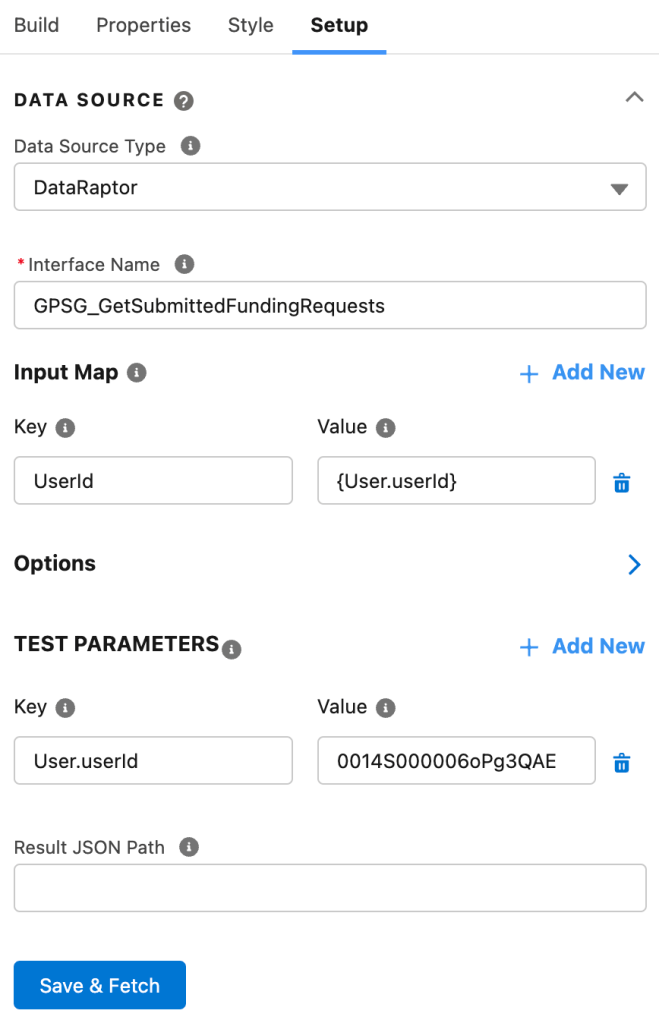
- Data Source: 1 x DataRaptor (type = Extract) that queries the one object and outputs all field values for the returned records. The example shows records that are owned by the current user, so the DataRaptor requires an input parameter: the current user’s Id.
- To build this DataRaptor, check out DataRaptor: Extract a List of Records. Instead of a record Id like CurrentRecordId, make your input parameter something like CurrentUserId.
- Your parent FlexCard does not need a data source.
- On your child FlexCard, you’ll need to configure the DataRaptor and the input parameter. On the Setup tab:
- Data Source Type:
DataRaptor - Interface Name:
name_of_your_extract_DataRaptor - In the Input Map section, click “Add New” and create a new pair:
- Key:
name_of_your_input_parameter
This is found in your DataRaptor (e.g. CurrentUserId). - Value:
{User.userId}This is a standard context variable available for a FlexCard that will appear for an authenticated user (internal or external). Include the curly brackets.
- Key:
- In the Test Parameters section, you’ll have an entry auto-created to match your input parameter. Add a test record Id to the Value field.
- Click the “Save & Fetch” button. This tests your DataRaptor with the test record Id you provided. It also populates some of the drop-down menus in the FlexCard Designer with the field variables names from your DataRaptor so that you can reference while building your card.
- Data Source Type:
Example #1: Input Variable is {User.userId}
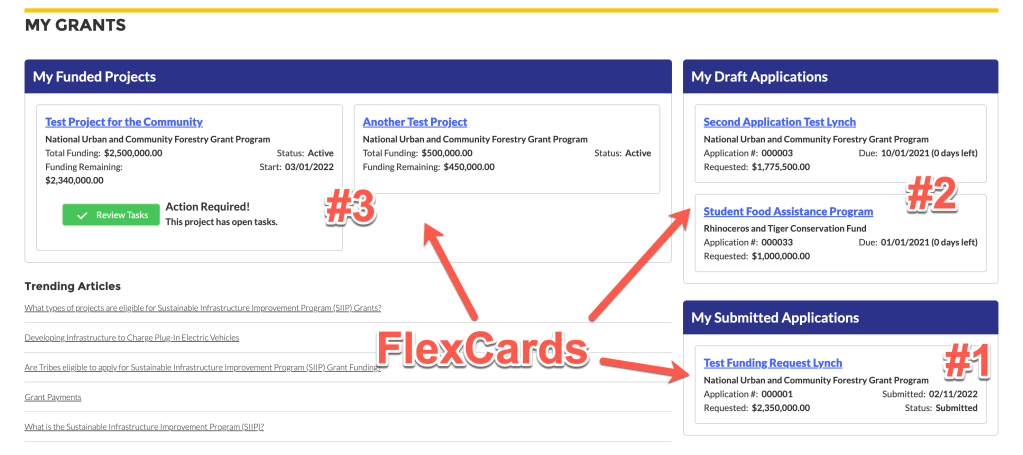
In this example, I created three FlexCards that show different lists of records that are important to the community user, and they all work the same way.
FlexCard #1 shows you what a list looks like when it only has a single record returned.
FlexCard #2 shows you a list with multiple records in it.
FlexCard #3 has an extra FlexCard embedded in it that only displays when that specific project record has an open task associated to it. The button navigates the user to the project record.
Note: These cards pass an input variable to their respective DataRaptors. I used the context variable {User.userId}.
Example #2: Input Variable is {User.userAccountId}
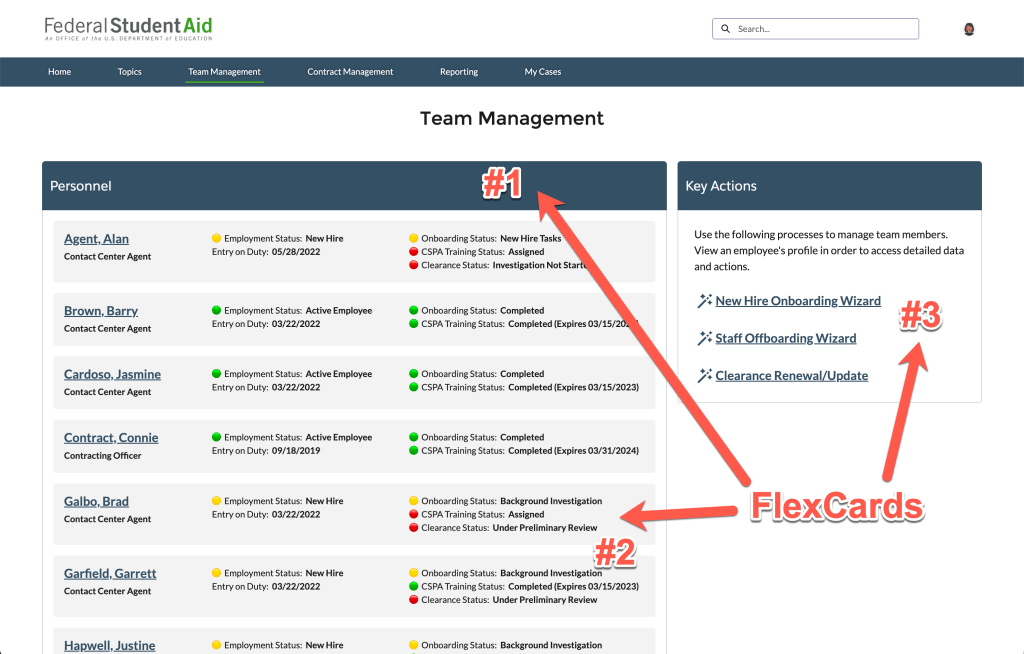
In this example, I present a list of employee contact records to the community user.
FlexCard #1 is the parent card that serves as a container for the list of employees. It has a title area and an outer border that contains the list.
FlexCard #2 is the child card that repeats for every employee contact record that is returned by the associated DataRaptor.
FlexCard #3 is a static content card (see FlexCard Pattern #1: Display Static Content). Fun fact: the links redirect the user to community pages where Flows reside (not OmniScripts).
Note: Instead of using the current user’s User Id to kick off this DataRaptor, I used a different context variable, the user’s Account Id. The context variable is {User.userAccountId}.
Example #3: Input Variable is {RecordId}
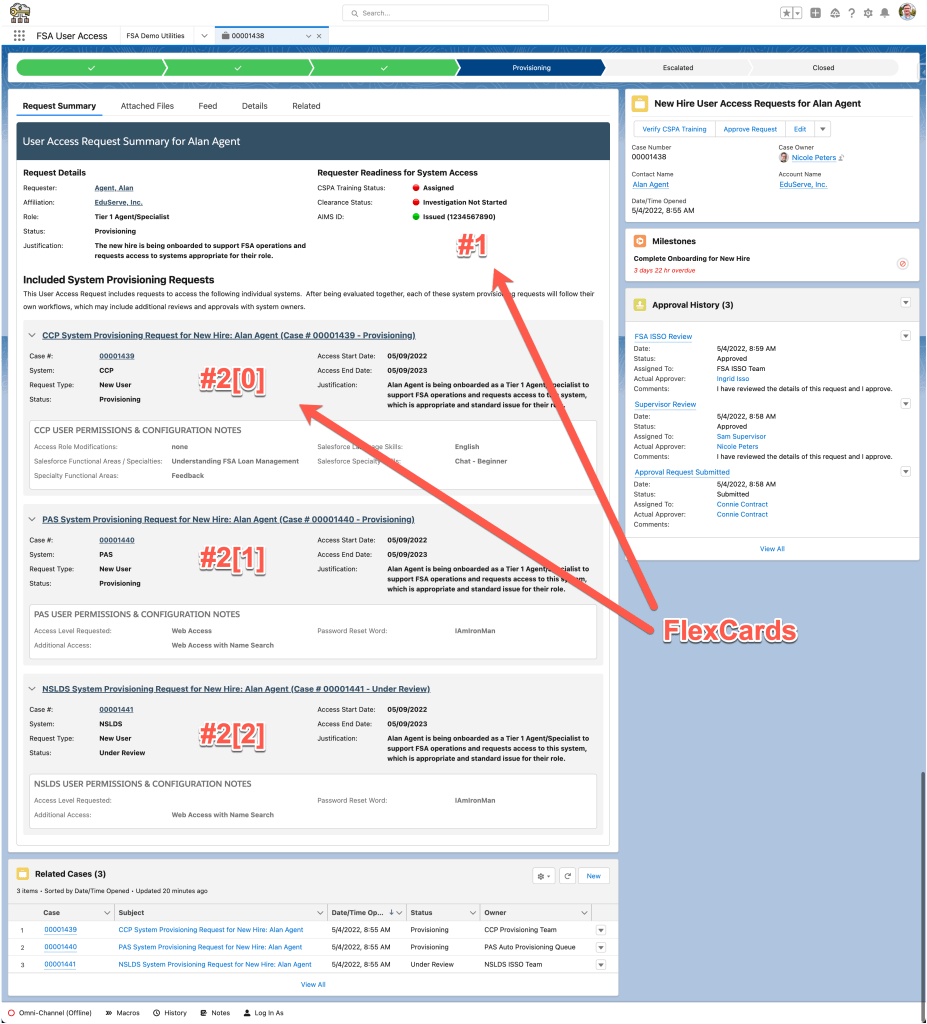
In this example, the FlexCard shows a parent Case record with child Cases.
FlexCard #1 serves not only as a container card for encompassing a list of Case records, it is itself displaying the parent Case details at the top. It passes the parent Case’s record Id to the embedded child card as an input parameter).
It also includes some data from the related Account and Contact records so they can be presented as actions (links that open those records). To achieve this, see the “Extend This: Grab Related Record Details” section of DataRaptor: Extract a Single Record.
FlexCard #2 is the child card that repeats for every child Case record that is returned by the associated DataRaptor (in the screenshot, it repeats three times).
Note: Instead of using the current user’s User Id or Account Id to kick off this DataRaptor, I used a different context variable, the record Id for the current record page. The context variable is {recordId}.

One thought on “FlexCard Pattern #3: Display a List of Records”